
Bulk task operations
Use Data > Tasks to apply the same operation to selected rows. The toolbar’s Bulk operation button appears after you tick a row.
Prepare the selection
- Search with a narrow scope, such as the required sample point, parameter and date range.
- Tick the intended rows. Where a task contains child results, review those child selections too.
- Check dates, locations and values, then open Bulk operation.
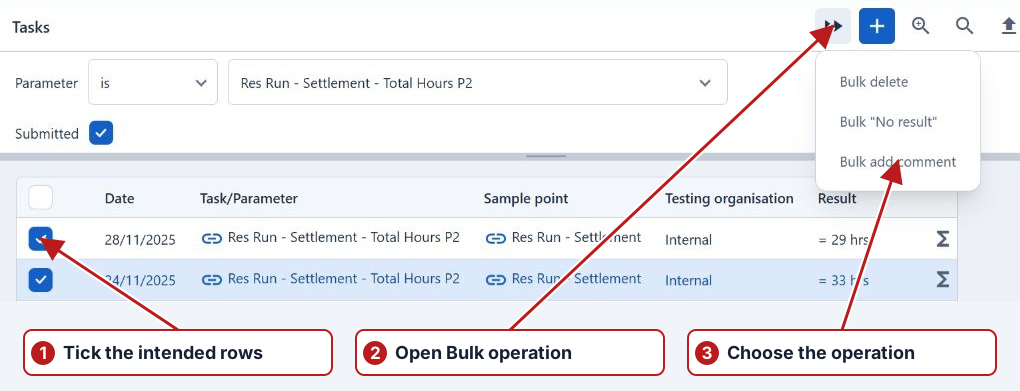
Bulk “No result”
Choose Bulk "No result", enter the required Reason and confirm the prompt. The request is queued for processing. Use this when the selected scheduled work should be recorded as No result or Not sampled, rather than inventing a measurement value.
A queued message confirms acceptance of the request. Check notifications for the final outcome and download any failures as described below.
Bulk add comment
- Select recorded result rows that have values and that you can edit.
- Choose Bulk add comment.
- Enter the shared Comment, up to 255 characters, then click Add. Cancel leaves the results unchanged.
- Read the reported number of updated results and inspect the comments or result history.
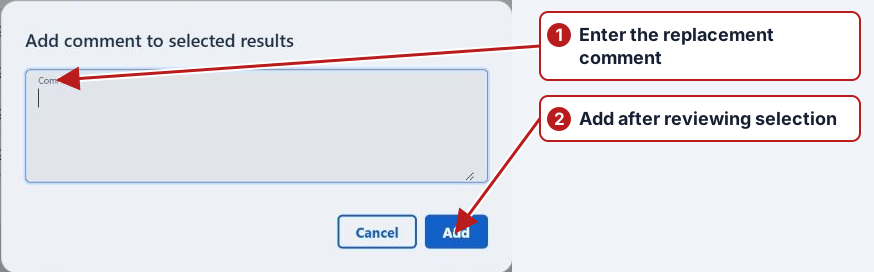
The action requires result-submission permission. Every selected row must be a recorded result with a value, be unlocked, and belong to you unless you can edit all results. A Take sample task, an unrecorded result, a No result entry, a locked result or a result outside your editing rights makes the selection ineligible. Deselect the unsuitable rows and inspect the remaining set.
Bulk delete
Select the recorded results or samples to remove, choose Bulk delete and read the confirmation before proceeding. The request queues deletion of the selected recorded results and samples. This is separate from deleting program occurrences or manual scheduled tests.
Review the resulting task state after processing. Use Delete multiple occurrences for program-generated work or Scheduler for eligible manual schedules.
Check progress and download failures
- Open Notifications using the bell icon. Bulk “No result” and bulk deletion show progress while processing.
- Read the final counts of items updated or deleted, failed, and not processed. Some items can succeed while others fail.
- If a failure report is available, click Download failures (.xlsx) on the completed notification and open the workbook.
The workbook lists each failed item with its sample point, parameter or sample name, scheduled dates, identifiers and failure reason. An item that no longer exists may have only its identifier and reason. Correct the reported causes, then select the failed items again if the operation is still needed.
Download the report before dismissing the completed notification: dismissing it also removes its report. If processing is cancelled, completed changes remain applied and the notification identifies how many items were not processed.
If the notification says Failure report unavailable, contact your administrator with the job ID shown. See Background jobs and Events for further investigation.