
Using Scheduler
Open Schedule > Scheduler to see testing periods by sample point and create manual scheduled tests. Programs remain the place to define recurring work and change program-generated occurrences.
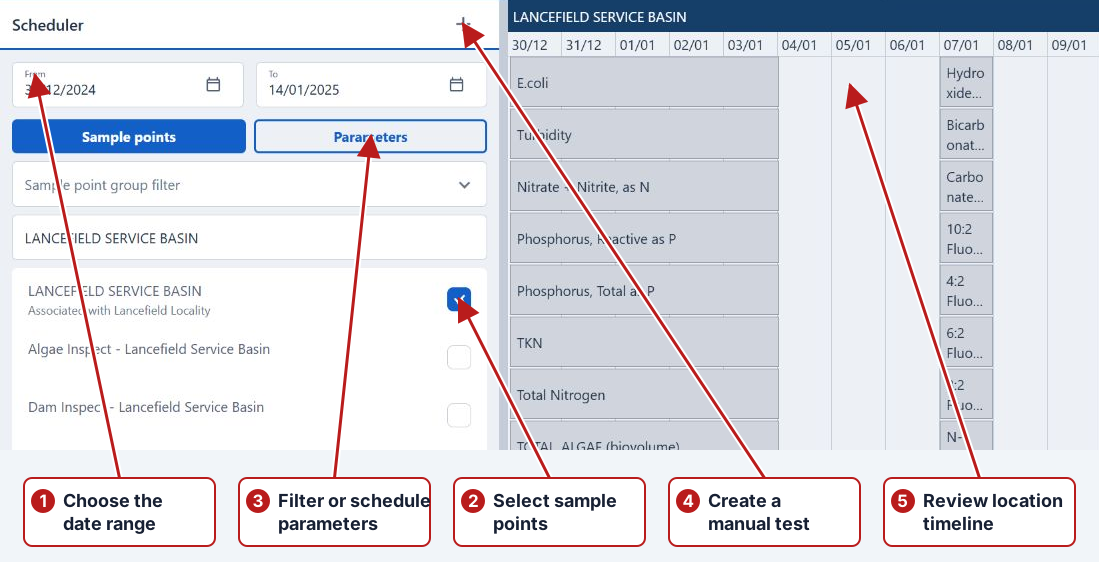
Choose the period and locations
- Set From and To to the period you want to review.
- In Sample points, use the group filter or Search sample point to find a location.
- Tick each required point. Its timeline appears on the right; changing dates or selected points refreshes the display.
- Use a timeline’s Remove button to remove that point from the display.
Filter crowded timelines
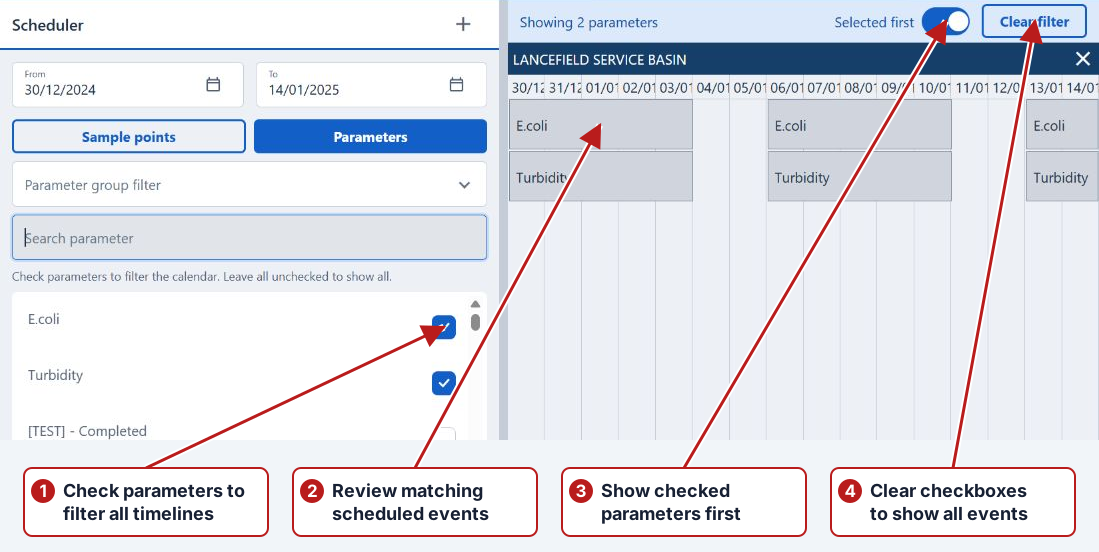
- Open Parameters. Use the group filter or Search parameter to find the measurements you want to review.
- Tick the checkbox beside each required parameter. The timelines show events for those parameters across all displayed sample points.
- Read the filter header above the timelines to see how many parameters are checked. Checkbox choices stay selected when you search, change the parameter group or switch between the two tabs.
- Turn on Selected first in the filter header to move checked parameters to the top of the current list. Search and group filters still apply. This switch setting is remembered in this browser when you reopen Scheduler or refresh the page.
- Use Clear filter to untick every parameter and display all events again. Unticking the last parameter also displays all events.
Create a manual scheduled test
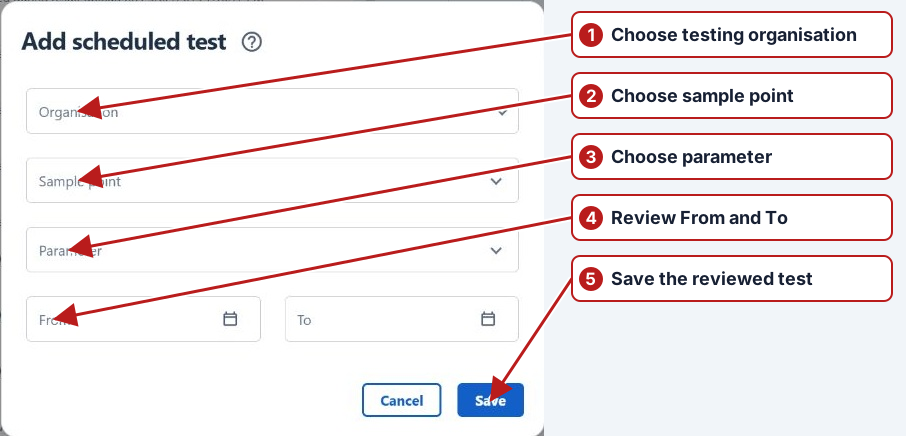
- Select a sample point so a timeline is displayed, then click Add new.
- Choose the testing Organisation, Sample point and Parameter.
- Enter the test’s From and To date/time. Review the full work period, rather than only its due date.
- Click Save. Use Cancel to discard the editor instead.
Schedule from the Parameters panel
Switch to Parameters and narrow the list by group or name. To schedule several parameters together, tick their checkboxes, keep them visible in the current list, and drag one of the checked rows onto a date in a sample point’s timeline. The drop includes all checked parameters visible in that list. Dragging an unchecked row schedules that single parameter and preserves your checkbox choices.
The editor takes the location and start date from the drop. Its initial end date uses Default scheduled test duration, in days in System > Settings > Schedule. Review the organisation and period before saving. A multi-parameter drop creates separate scheduled tests for the checked parameters using those common choices.
Edit, move or delete manual work
| Action | How it works |
|---|---|
| Edit | Double-click an eligible manual test, or use its context menu > Edit. Review the fields and Save. |
| Move or resize | Drag an eligible test on the timeline or resize its period. The changed period is saved directly; there is no separate Save step for this gesture. |
| Select several tests | Hold Ctrl while clicking additional tests. A click without Ctrl starts a new selection. |
| Delete | Use the selected tests’ context menu > Delete and review the confirmation. All selected tests must be eligible manual work. |
| Go to result | For a single selected test, open its context menu > Go to result to review the corresponding Tasks entry. |
See Program scheduling and testing, Result entry and Application settings.