
Import program test series
Use a spreadsheet to create dated sampling and testing work in an existing program. Open Schedule > Programs, select the program and choose Test series > Import. This imports the planned work; laboratory result files are imported separately through Data > Imports.
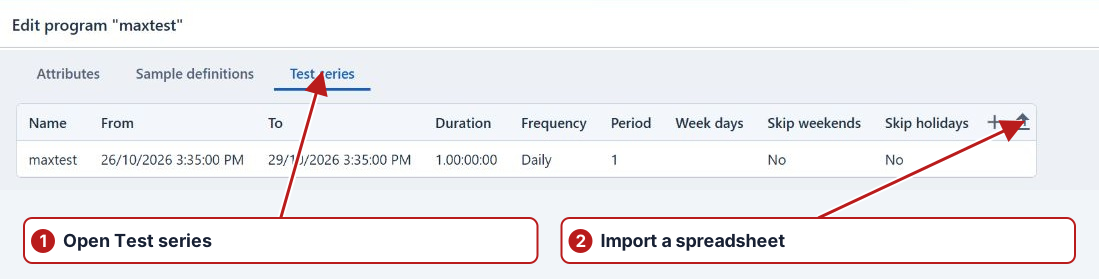
Prepare the spreadsheet
Use XLSX, XLS or CSV. The first worksheet supplies the data, with headings in its first row. Include Date, a sample-point identifier in the second column, and Parameter group.
| Column | Required content |
|---|---|
| Date | An Excel date or an Australian-format date such as 12/10/2026. Use an unambiguous date and include time if required. |
| Second column | Its heading must match a Sample point custom attribute. Each row’s value must match that attribute on the intended sample point. |
| Parameter group | The name of an existing group containing the parameters to schedule. |
Equivalent example
Suppose the sample-point custom attribute is named Sampling Point, with unique codes SP001 and SP002. Prepare this first worksheet:
| Date | Sampling Point | Parameter group |
|---|---|---|
| 12/10/2026 | SP001 | Routine water quality |
| 12/10/2026 | SP002 | Routine water quality |
| 19/10/2026 | SP001 | Routine water quality |
Create the matching custom-attribute values and parameter group before importing. The example produces work for two locations on 12 October and one on 19 October, using the parameters in the named group. Imported occurrences span one day from each supplied date.
Submit and review the import
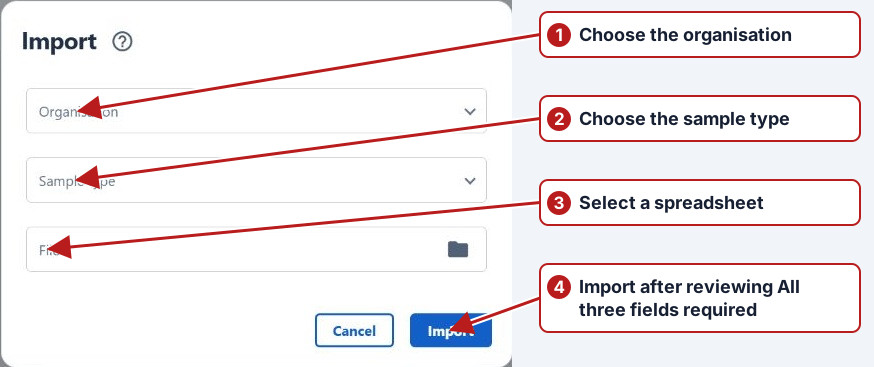
| Dialog field | What to choose |
|---|---|
| Organisation | The testing organisation for the imported work. It applies to the imported sample definition; location identifiers still come from the spreadsheet. |
| Sample type | The sample type that matches the intended sampling workflow. It applies to the imported work, rather than being selected separately for each spreadsheet row. |
| File | The prepared XLSX, XLS or CSV file. Click the field or its folder button to open the file picker. The selected filename appears in this read-only field; do not type a path into it. |
- Open the intended saved program and its Test series tab.
- Choose Import, then select Organisation and Sample type.
- Click the File field or folder button, choose the prepared spreadsheet and check its displayed filename.
- Review the program, organisation, sample type and file before clicking the dialog’s Import action. Use Cancel to close without submitting the file.
- Wait for background processing. Review the notification for the file you submitted.
- Inspect the imported series, its occurrences and generated tasks. Confirm the dates, sample points, group parameters and organisation before using the plan.
Distinguish upload from completion
After submission, the app reports that the file has been uploaded and will be processed shortly. A new series appears in Test series, but that does not establish that the spreadsheet has been processed successfully. Follow the request in Notifications:
| Message | Next step |
|---|---|
| Importing | The file is being processed. Wait for its outcome before submitting another copy. |
| Imported | Refresh or reopen the program. Inspect the series, occurrences and generated tasks against the spreadsheet and the selected organisation and sample type. |
| Import failed | Read the notification’s description. Correct the file or definitions and review the existing series before retrying. |
| Import cancelled | Review the series and any work already present before deciding whether to submit a replacement. |
If processing appears stuck, check the related background job and record its state and reason. The program’s Test series list is not the laboratory Imports browser.
An empty worksheet, invalid date, missing group or unmatched location code prevents a successful import. Check the message, correct the file or definitions, and review any already-created import series before submitting again.
See Custom attributes, Program scheduling and testing and Laboratory result imports.