
Parameter Methods in Detail
Parameter Methods allow you to set up a single Parameter definition with one or more Methods, each with a Unit of Measurement, associated Instrument, Expression and associated Sample Point Groups or Sample Points.
The Test methods tab on the Parameter screen is where you set up a Default Method which will be used for all Sample Points unless there is another Method for specific Sample Point(s) or Sample Point Group(s). Parameter Methods may have an associated Unit of Measurement, Instrument and calculation Expression.
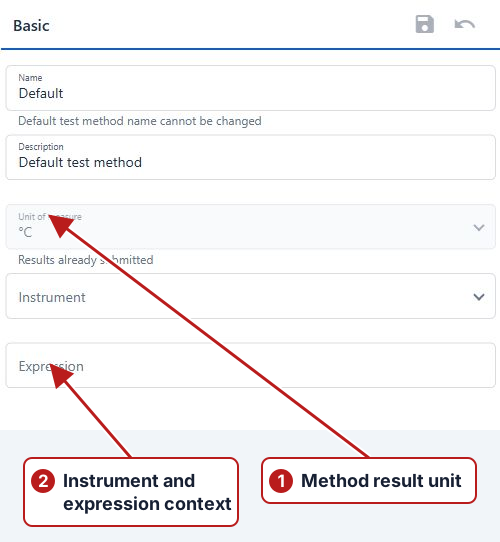
Examples -
- You may have set up a Parameter which only has the Default Method in place. This Method also has an Expression which uses the specific gravity of a chemical in the calculation. When a new lot of this chemical is delivered, you find that the specific gravity of the lot has changed. Therefore you would need to create a new Method with an Expression which uses the new specific gravity in the calculation. Associate the new Method with the applicable Sample Points or Sample Point Groups and From/To period. It then overrides the Default Method for those matching locations and dates.
- You may have a requirement for Aluminium to be measured in water using a Unit of Measurement of mg/L and for Aluminium to be measured in soil with a Unit of Measurement of mg/kg. In this instance you would need to define the Aluminium Parameter with one Method for soil and another Method for water, each with their respective Unit of Measurement.
- You may have a requirement for meter flow readings to be taken at many locations. In this instance you would define a single Meter Reading Parameter with several Methods, each with a specific Unit of Measurement, Instrument(meter) and associated Sample Point.
Parameter Methods in Action
Example 1 (Meter Replacement) -
A Meter Read Parameter that you use for meter readings MUST HAVE an Instrument (meter) associated to the Method being used. When a meter is to be replaced, a new Parameter Method is defined associated to the new Instrument (meter) and the same Sample Point.
Here is the set up for meter reading and replacement -
The Meter Read Parameter has a Method associated with the current Instrument(meter).
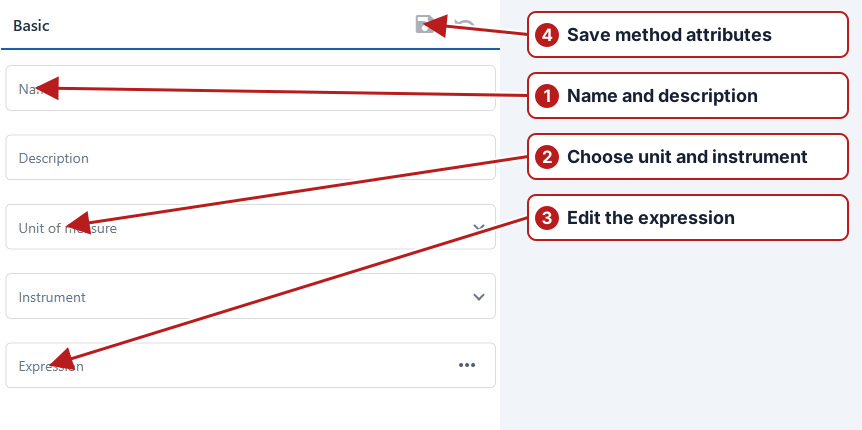
Replacing a Meter
To ensure that any volume calculations remain valid, the following procedure MUST BE followed in order when replacing a meter.
- Take a final meter reading for the Instrument (meter) which is going to be replaced and enter the Result into the system.
- Only do this if the above applies - On the Scheduler manually delete any future scheduled meter reads that are associated to the meter being replaced. This is because any future meter readings will still be associated to the meter being replaced.
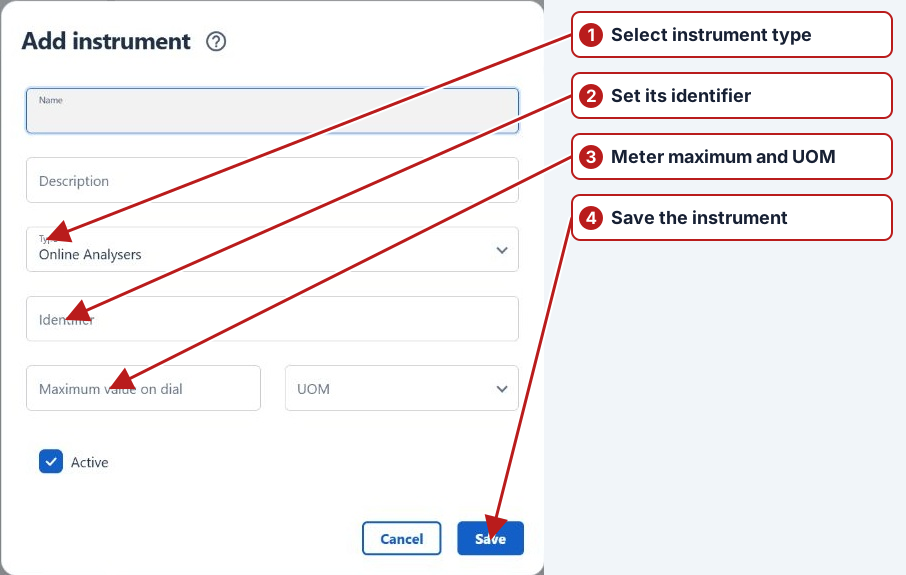
- Select the meter Instrument Type and create a new uniquely named Instrument(meter).
- Go to the Meter Read Parameter and create a new Method associated to the new Instrument(meter) and the Sample Point.
| Setting | Selection |
|---|---|
| Instrument | New uniquely named meter |
| Sample point | Same physical meter location |
| From | Replacement date/time |
| Expression | Reading method; calculated Diff/Total parameters retain their own expressions |
- This step is only needed if you are manually scheduling via the Scheduler instead of a Program. Schedule future meter reads with the new meter starting from the date that the new meter was installed.
- Install the new meter.
- Take the initial meter reading of the new meter as soon as it is installed and enter this reading into the system.
Example -
| Date | Instrument / reading | Difference | Total |
|---|---|---|---|
| 18 May 2016 | Old meter: 400 | 0 | 0 |
| 19 May 2016 — first | Old meter final reading: 50 | 649 | 649 |
| 19 May 2016 — later | New meter initial reading: 200 | 649 — unchanged at the transition | 649 |
| 20 May 2016 | New meter: 375 | 175 | 824 |
Example 2 - Suppose you have two tanks at different Sample Points both holding alum coagulant and both require tank inventories as part of process monitoring. However, the way they are calculated is different.
| Scenario 1 | Scenario 2 |
The required calculations are -
| Sample point | Input reference | Output references | Inventory calculation |
|---|---|---|---|
| Tank 1 | A | B, C |
Latest(A, L) - Latest(B, L) - Latest(C, L)
|
| Tank 2 | A | B, C, D |
Latest(A, L) - Latest(B, L) - Latest(C, L) - Latest(D, L)
|
The Aquantify set up will look like this -
Create Parameters A, B, C and D with their respective references A, B, C and D.
Create Sample Points Tank 1 and Tank 2.
Scenario 1
Create a Parameter Alum Coagulant Tank Inventory with two Methods, one for each Scenario with the appropriate associated Sample Point and Expression.
| Parameter | Sample point | Expression |
|---|---|---|
| Alum Coagulant Tank Inventory | Tank 1 | Latest(A, L) - Latest(B, L) - Latest(C, L) |
Scenario 2
| Parameter | Sample point | Expression |
|---|---|---|
| Alum Coagulant Tank Inventory | Tank 2 | Latest(A, L) - Latest(B, L) - Latest(C, L) - Latest(D, L) |
Example 3 - For a Parameter like Aluminium you may need to measure it in water samples using a Unit of Measurement(UOM) of mg/L, and in soil samples using a UOM of mg/kg.
| Method | Unit | Location |
|---|---|---|
| Water | mg/L | Sample Point 1 |
| Soil | mg/kg | Sample Point 2 |
In Aquantify set up will look like this -
Create the Aluminium Parameter
Create Sample Point 1 and Sample Point 2.
Scenario 1
Create the Aluminium Parameter, firstly with a Water Method with UOM mg/L and associate this method to Sample Point 1.
Scenario 2
Create a Soil Method with a UOM of mg/kg and associate this method to Sample Point 2.
| Method | Unit | Location |
|---|---|---|
| Soil | mg/kg | Sample Point 2 |
File Import and Methods
In the above example you would schedule the Aluminium Parameter at both Sample Points with a Testing Organisation of External Lab if appropriate. The lab import file will contain a record for Aluminium at Sample Point 1 with a UOM of mg/L and another record for Aluminium at Sample Point 2 with a UOM of mg/kg. During the lab import the system will find the Method with the highest Priority with matching criteria and this Method will be used. Otherwise the default Method will be used. If a problem is experienced during the Result import an error will be produced and the Result will NOT be imported.